...

This office is closed on weekends. We are open Monday through Friday at 8:00 AM (Central Standard Time).

+8618730921709 | Hours:8am-6pm csT, Monday-Friday​

O-Ring splicing kits

O-Ring Splicing Kits Overview

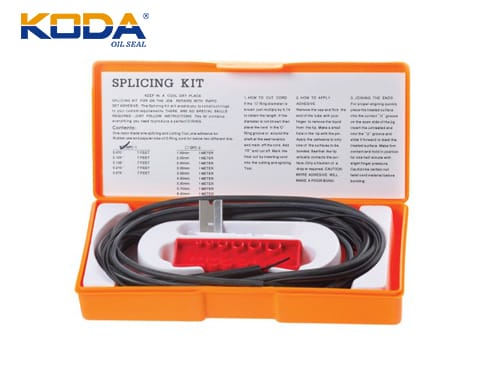
O-ring splicing kits are practical tools for quickly fabricating custom-sized O-rings on-site. A complete kit typically includes O-ring cords of various cross-sectional sizes, splicing clamps, cutting blades, quick-drying adhesive, and a detailed step-by-step instruction manual. Both standard and metric splicing kits offer a variety of materials, hardnesses, and specifications to meet the customization needs of different scenarios.

It is important to note that spliced O-rings are only suitable for static sealing applications. On-site splicing of O-rings can serve as an emergency sealing solution. For a more reliable seal, it is recommended to use hot-melt vulcanized O-rings (suitable for static conditions) or molded O-rings (suitable for both static and dynamic conditions).

Customized O-ring connector kits are also available. For a quote on a customized O-ring connector kit, or any questions about our kits, please call +86 18730921709 or fill out the product inquiry form. The table below lists common standard and metric connector kits available in our online store.

O-Ring KitKit ImageKit DescriptionKit Compounds
Standard Splicing KitKODA-splicing_kit-200x1475 Pieces | 7 Feet Each
Includes blade, splicing JIG, and tube of rapid set adhesive for immediate onsite repairs
N70 | N90 | V75 | V90 | BV75 | E70 |

A75 | C70 | QN70 | QV75
Metric Splicing KitKODA-splicing_kit-200x1479 Pieces | 1 Meter Each
Includes blade, splicing JIG, and tube of rapid set adhesive for immediate onsite repairs
MN70 | MV75 | MV90 | ME70

How to splice O-rings?

O-ring Splicing Operation Steps

1. Measurement and Marking: Wrap the O-ring rope around the sealing installation position and make the first mark. Then mark the second mark 0.5 inches after the first mark. If the target diameter of the O-ring is known, calculate the required rope length using the formula circumference = diameter × 3.14, and then mark the first and last points at the above intervals.

2. Rope Threading and Positioning: Thread the O-ring rope into the corresponding circular hole of the splicing clamp, adjusting the position so that the auxiliary mark is precisely aligned with the clamp opening.

3. Precise Cutting: Cut the rope along the middle of the clamp with a blade. The distance from the clamp opening to the cut center line should be 0.5 inches. The auxiliary mark ensures accurate cutting dimensions.

4. Applying Adhesive: Apply quick-drying adhesive only to one cut end of the rope, using slightly less than a drop. Note: Applying too much adhesive will significantly reduce the joint bonding strength.

5. Connecting and Fixing: Flip the clamp to the groove side. First, slide the glued end of the rope into the corresponding groove. Then, carefully slide the unglueed end of the rope into the groove from the other side until both ends are completely aligned.

6. Pressing and Curing: Gently press the joint with your fingers and hold the pressure for 30 seconds. Avoid twisting the rope during this process.

7. Ready for Use: After the operation is complete, the assembled O-ring can be directly used for static sealing.

Chat with https://oilseal-china.com/

Our business hours are Monday to Friday, 8:00 AM to 6:00 PM. Please leave a message on the “Contact Us” page, and we will reply to you within one business day. Please submit your message here: Contact Us

0

Subtotal